
Spring is here! What better way to celebrate
than a refreshing Orange "Ice Box" Cake!?
Ice box cakes aren't really cakes at all but wafers layered with whipped cream. The wafers soften overnight and in the morning you have wonderfully moist delicious cake! My Orange Cake has all the components but subs out the wafers for thin layers of delicious cake!
This post is all about how to make Orange "Ice Box" Cake, and how to stack the finished cakes properly. I separated how to make the fondant flowers into a different post.... here!
Just want the recipes?? Click the links below for printer friendly recipes or keep scrolling for complete recipes at the end of this post!

Below is the steps to make a 6" round Orange Cake,
which will serve about 10
To make the cake pictured above I also had a 4 layer 8" round cake.
This finished cake will feed up to 40 guests.

Start with about 10 Clementine oranges, or about 5 large navel oranges.
Zest and segment 1/2 of the oranges and juice the remaining.

To segment the oranges, cut away all the rind and white pith.

Carefully cut out the segments from the inner skin
so you are left with only the tender flesh of the orange.

Measure out about 1/4 cup of juice, a few segments,
and 1 tsp orange zest for the cake batter.
The rest will be used later for layering the cakes.

Mix flour, baking powder, salt, and orange gelatin mix in a stand mixer.
Mix on low for 1 minute to incorporate the ingredients evenly.

Add melted butter, orange juice, segments, and zest and oil.
Blend until smooth, about 2 minutes on medium.

Next add in the eggs and milk in 2 or 3 separate additions,
scraping the sides of the bowl between each addition.

Portion the batter into 2- 6" round cake pans.
To finish the cake you'll need 1-6" round cake pan with sides that are 3" high.
If you don't have a pan with sides this high
you'll need to assemble the layers into
2- 6" pans then 'join' them together to finish the cake... more on this later

Bake in a pre-heated 350F oven for 20-30 minutes
or until a toothpick can be inserted
into the middle of the cake and come out clean.
If possible bake the cakes on one rack in the middle of the oven,
and rotate the pans every 10 minutes to ensure even baking.
Remove to a cooling rack and cool to room temperature.

Slice the cooled cake into thin layers, try to get as many layers as possible.
The more layers, the moister the finished cake will be.
Not a pro a cutting even cake layers?? (who is!)
Try sticking the cooled cakes in the freezer
for a few minutes to firm the texture a bit.

Take about 1 cup of the remaining juice and mix with 1 cup of sugar.
Heat in the microwave just until the sugar melts, about 30 seconds.
Stir and cool to room temperature. Add remaining zest.

Line one 6" round pan with 3" high sides with plastic making sure the
plastic hangs over the edge about 2".

Place one layer of cake in the bottom of the pan.
Soak the layer with the orange sugar mixture,
sprinkle in some of the reserved segments.

Whip 2 cups of heavy cream with 2 tbl of powdered sugar until medium peaks form.
(You can also use thawed store bought whipped topping such as Cool Whip)

If the cake is going to be served more than a day after preparing
it you may want to 'stabilize' the whipped cream.
To do this melt about 1 tbl of orange gelatin into just enough
hot water to cover the jello about 1-2 tbl.
Cool slightly and whip this with the heavy cream and powdered sugar.
The gelatin will help the finished whip cream hold its shape longer.

Spread some of the whipped cream over the soaked cake layer.

Repeat this process with cake, orange syrup, segments,
and whipped cream until all the cake layers have been used.
Any extra whipped cream (which you should have plenty)
should be saved for frosting after the cake has been chilled.
If using two 6" round pans with lower sides follow the remaining steps
in one pan until it is filled, if necessary line the second pan
and repeat until all the cake and filling ingredients are used.

Fold the overhanging plastic wrap over the last cake layer
and chill overnight, or for at least 3 hours to allow the cake
to become fully soaked with whipped cream and orange flavor.

After the cake is chilled unwrap and place a small cardboard cake round on top.
If you are not stacking this cake you can transfer the
6" cake right to a serving platter at this point.
If you are stacking the cake remember to punch a small hole
in the center of the cardboard round before inverting the cake.

Invert the cake onto either a serving platter or a cake turner.

Unwrap the plastic completely.
If using 2-6" cake rounds with lower sides invert one onto a serving platter or
cake turner then place the other directly on top with a small layer
of whipped cream to 'join' the two layers.

Frost the cake with the reserved whipped cream.

And your orange cake is done! Enjoy!
Since the whipped cream is delicate this cake should not stay
out at room temperature longer than 1 hour.
If you are making a stacked centerpiece cake...keep reading!

To stack the cakes you'll also need to repeat this
same process but with 4 layers of 8" cake.
The 6" layer recipe can be tripled to make enough for 4 layers of 8" cake.

You'll need three wooden skewers that have been sharpened
slightly to a point to help drive them easily through the cake.

Insert one skewer into the 8" layer until you reach the base of the cake.
Measure the height of a finished fondant daisy and mark it onto the skewer.
Remove the skewer from the cake and cut it to the mark. Cut two more skewers to the exact same length. Insert them into the cake making sure they are level. Insert them in a circle where the edges of the 6" layers will fall. Use a spare 6" cardboard cake round or cake pan to measure where the edges will fall on the 8" cake.

Now you'll need a skewer that is as tall as the finished cake will be... the 8" layer, the 6" layer and the empty space in between. Drive the tip of the skewer through the 6" layer coming out through the hole in the cardboard round.
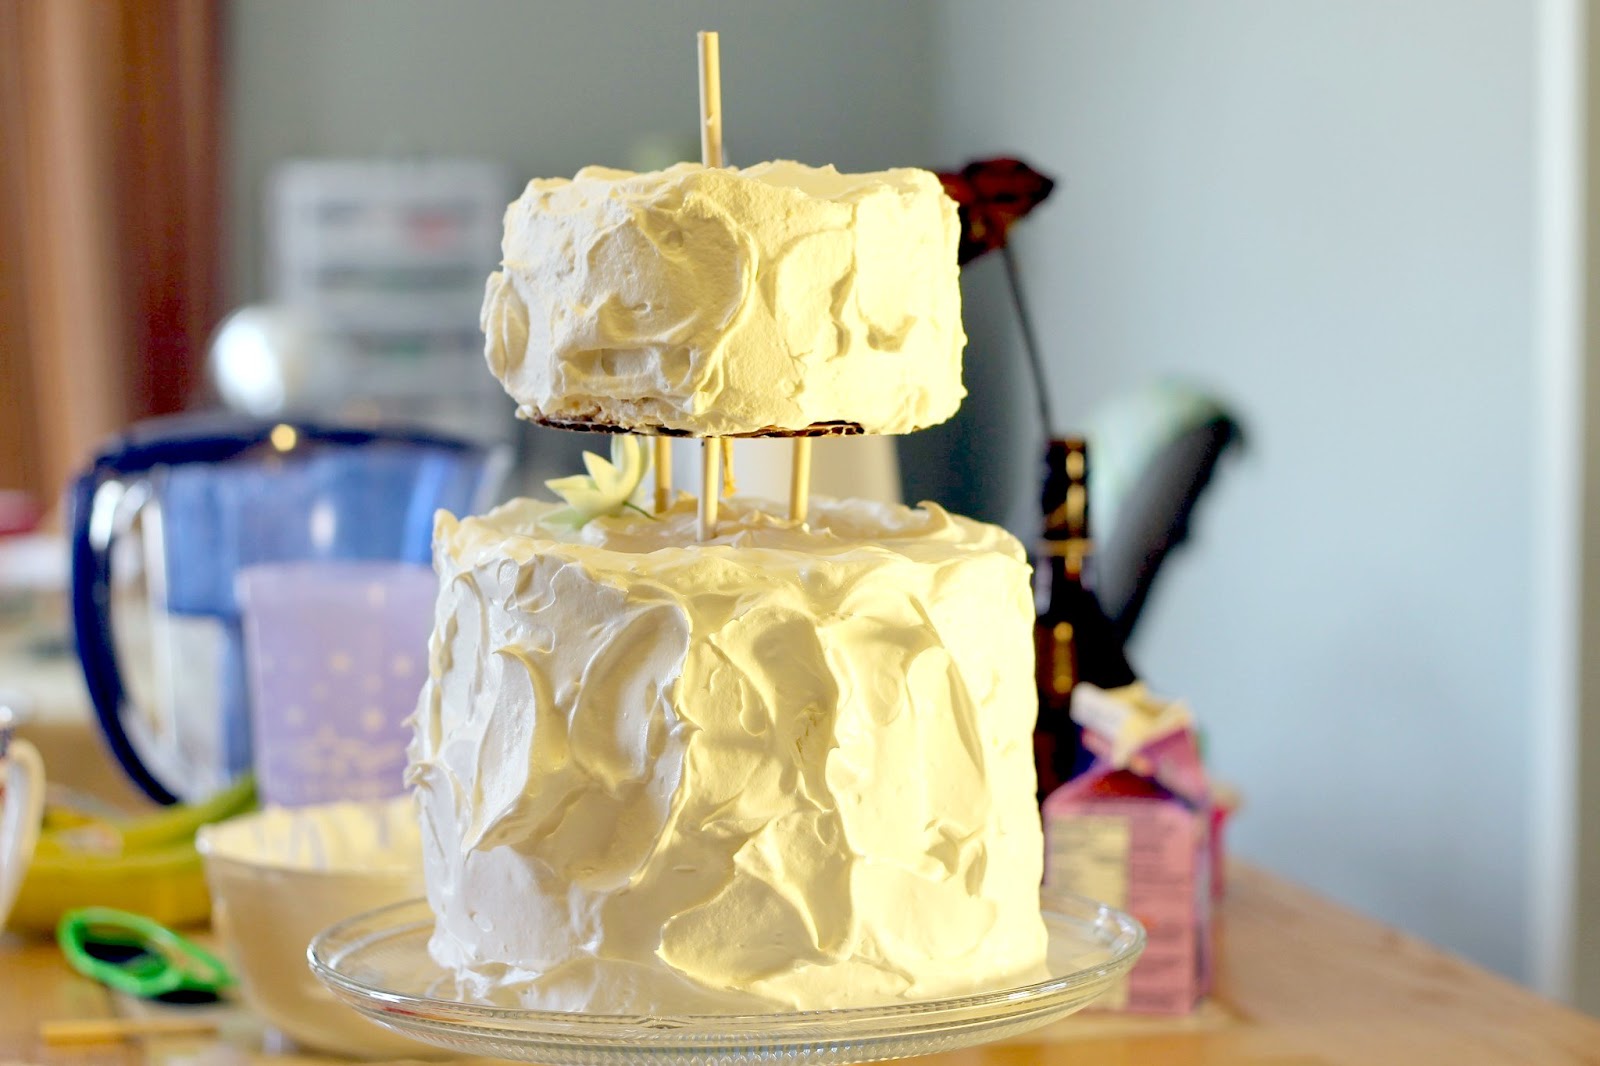
Position the 6" layer on top of the 8" layer. Once level, drive the middle skewer through the 8" layers until it reaches the bottom.
At this point the cake will be pretty secure,
but as with any stacked cake move carefully from this point on to avoid disaster!

Decorate the cake with finished fondant daisies or any other type of flower.

And voila! Your cake is done!
I added a few fondant leaves to give the cake a little extra color.
Chill until serving and enjoy!

Orange "Ice Box" Layer Cake (Click for printer friendly recipe)
Yield- 1- 6" Round Layer Cake Serving 10
Prep Time: 20 minutes (before baking) 1 hour + overnight chill (after baking)
Cooking Time: 30 minutes
Total Time: 2 hours + overnight chill
Special Equipment needed: 2- 6" round cake pans, 1 with sides that are 3" high (if you don't have a cake pan with high sides see tip at bottom of recipe)
Ingredients:
2 cups All Purpose Flour
1 cup Sugar
3 tablespoons Orange Gelatin Mix
1/2 tsp Salt
2 1/4 tsp Baking Powder
5 tablespoons Melted Butter, unsalted
2 tablespoons Oil
1/4 cup Fresh Orange Juice
1 tsp Fresh Orange Zest
1/4 cup Milk
2 Whole Eggs
1/2 cup Sour Cream
1/2 cup Fresh Orange Juice
1/2 cup Sugar
2 cups Heavy Cream
2 tablespoons Powdered Sugar
Method of Preparation:
1. Spray two 6" round cake pans with non-stick cooking spray. Preheat oven to 350F.
2. In a stand mixer fitted with the paddle attachment, mix the flour, sugar orange gelatin mix, salt and baking powder. Mix on low speed for 1 minute. Add melted butter, oil, orange juice and orange zest. Mix on medium speed for 2 minutes, stopping halfway to scrape the sides of the bowl.
3. In a small bowl mix eggs with milk and sour cream. Add the egg mixture to the flour mixture 1/3 at a time. Mixing for 1 minutes and stopping to scrape the sides of the bowl before adding more egg mixture.
4. Divide the batter between the two cake pans. Tap them gently on the counter to release any air bubbles.
5. Bake in preheated oven for 20-30 minutes or until a toothpick inserted into the middle comes out clean.
Tip: Bake using only the center oven rack and turn the pans every ten minutes to ensure even baking.
6. Remove from oven and cool in the cake pans until room temperature. While cakes are cooling heat remaining 1/2 cup of orange juice in the microwave for 30 seconds to 1 minute or until the sugar is melted. Cool to room temperature. Whip heavy cream with powdered sugar until soft peaks form. Chill until needed.
7. Line a clean 6" round cake pan with 3" high sides with plastic wrap making sure to overlap the edges. Leave about 2 inches of plastic wrap extended over the sides of the pan to wrap the top of the cake once layered inside.
8. Slice the cooled cakes into 6 even layers, 3 layers per cake. If cakes are too thin to slice into 3 layers, slice into 2 even layers.
9. Place one layer of cake into the pan lined with plastic wrap. Soak the layer evenly with 1-2 tablespoons of the orange juice and sugar syrup. Spread a layer of whipped cream, and if desired a few segments of fresh or canned clementines. Repeat this step until all the layers of cake are used. Wrap the overhanging plastic over the top and refrigerate overnight to allow the syrup and whipped cream to soak into the cakes completely. You should have some whipped cream left over to top the cake with later, place in a clean bowl and chill until needed.
Tip: You can also use Cool Whip in place of fresh whipped cream.
10. Carefully pull the cake from the pan and onto a serving dish. Unwrap the plastic and ice with remaining whipped cream. Chill until needed or enjoy immediately!
Tip: If you do not have 6" round cake pan with 3" high sides you can split the cake into two pans and stack them together after chilling.
Gluten Free Orange Cake (Click for Printer Friendly Recipe)
Yield 16 cupcakes
Total prep time: 20 minutes
Bake Time: 20-30 minutes
Total Time 60-90 minutes (including cooling)
Ingredients:
1/2 cup Coconut Flour
1/2 cup Sweet Rice Flour
1 1/2 tsp Xanthan Gum
2 tsp Baking Powder
2 tbl Orange gelatin powder
1/2 cup Oil
2 tbl Melted Butter
4 Eggs
1/2 cup Agave Syrup
1/2 cup Sugar
1 tbl + 1tsp Vanilla Extract
1/2 cup Orange Juice
2 tsp Orange Zest
1/2 tsp Orange Extract
Method of Preparation:
Pre-heat oven to 375F
1. Mix coconut flour, sweet rice flour, xanthan gum, baking powder, orange gelatin powder. Mix with a whisk to evenly incorporate all the ingredients.
2. In a separate bowl mix the remaining ingredients.
3. Blend the wet ingredients into the dry and mix until smooth. The batter will appear very thick due to the coconut flour which absorbs much more liquid than regular flour.
4. Divide the batter into 16 cupcake tins with liners. Bake for 15-20 minutes or until the tops of the cupcakes are firm to the touch. Remove from oven and cool for 20-30 minutes.
5. If not serving same day as baking sprinkle cooled cupcakes with simple syrup to keep moist.
Heat 1/4 cup water with 1/4 cup sugar until sugar is melted, cool slightly and sprinkle on cupcakes.
6. Frost cooled cupcakes with whipped cream and enjoy!
No comments:
Post a Comment